Last Updated on December 25, 2023
Today, we’re going to be looking at the perfect chocolate marble cheesecake recipe. And learning how to marble cheesecake (it’s actually easier than you may think!). Whether you’re looking for a no-bake cheesecake, or a diet marble cheesecake – we’ll be covering it all today.
And guess what? Cheesecake is not only one of the best desserts, but it’s also one of the easiest to get right too; making it the ideal dinner party dessert. Let’s take a look first at how to marble cheesecake.
How To Marble A Cheesecake?
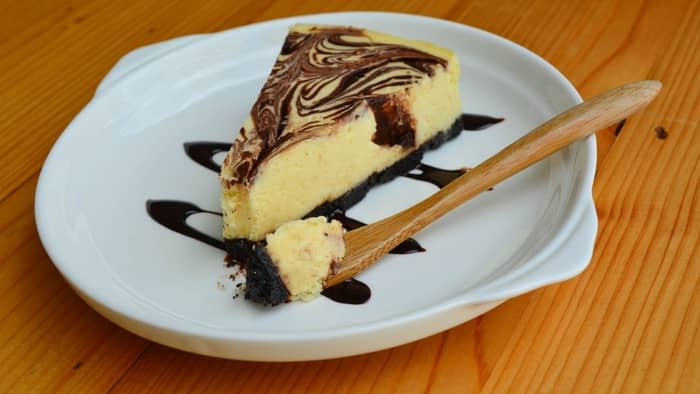
Marbling cheesecake is really simple and just requires one tool: a skewer or toothpick. Usually, chocolate and vanilla are the primary flavors in a marble cheesecake. If you have vanilla as your base, before you chill the cheesecake, drizzle the chocolate flavor on top of the cake.
And then using a skewer, swirl, and spiral the top of the cheesecake – there is no right or wrong way to do this. If you’d prefer to make something like a spiral shape, just use a piping bag to drip dollops of flavor in a circle, circling closer to the center of the cake as you go. There are a variety of patterns and designs you can make when it comes to cheesecake, but for me, marbling makes the best effect.
No-Bake Chocolate Swirl Cheesecake Recipe
The first recipe we’re going to look at is inspired by a No-Bake Chocolate Swirl Cheesecake from Cook It Real Good. What’s great about this recipe is that as it requires no baking, it takes just 30 minutes to make! Let’s take a look at how to make this delicious cheesecake.
Ingredients
The ingredients you’ll need for this recipe are:
- 2 packets of Oreos
- 1/3 cup of butter
- 2 8oz blocks of cream cheese
- 1/4 cup of caster sugar
- 2 teaspoons of gelatine
- 1 cup of white chocolate
- 1 cup of heavy cream
- 1/2 cup of milk chocolate
- grated chocolate (for decoration)
- chocolate eggs (for decoration)
- fresh fruit (for decoration)
Recipe
Now all you need to do is:
Step 1: Prepare the crust
Grease a pan with spray oil, or butter. Pulse the Oreos in a food processor until you have very small crumbs. Grab a microwave-safe bowl and melt the butter. Now add the butter to the pulsed Oreos and mix well. Pour the mix into the pan and press down to ensure it’s tightly packed in there. Chill in the refrigerator.
Step 2: Prepare ingredients
Prepare your gelatine according to the instructions on the packet. Set aside. Break up your white chocolate and melt in a microwave; stirring often. Set aside. Break up your milk chocolate and melt in a microwave, stirring often. Set aside. In a separate bowl, add cream and mix until you have stiff peaks. Set aside
Step 3: Make the filling
For the filling, add the sugar and cream cheese to ina bowl and mix until it’s smooth. Pour in the gelatine and white chocolate. Mix well. Now add the whipped cream. Remove the base from the fridge and pour the mixture over the top. Now spread the milk chocolate on top of the cheesecake and use a skewer or toothpick to make the marble effect.
Step 4: Enjoy!
Leave for at least a few hours; however, it’s best if you leave it in the refrigerator overnight. Remove the cake from the pan, slice it up and enjoy!
Diet Marble Cheesecake Recipe
If you’re looking for a diet-friendly marble cheesecake, we have the perfect recipe from A Family Feast. Let’s take a look at this Skinny Marble Cheesecake recipe.
Ingredients
The ingredients you need for this recipe are:
- few sprays of oil spray
- 3/4 cup of graham cracker crumbs (light)
- 1 tablespoon of melted butter
- 8oz of reduced-fat cream cheese
- 1/4 cup of granulated sugar
- 1 tablespoon of vanilla extract
- 3/4 of fat-free Greek yogurt
- 2 egg whites
- 1/2 teaspoon of lemon juice
- 1 tablespoon of all-purpose flour
- 1 tablespoon of cocoa powder
- 1 teaspoon of low-fat milk
Recipe
Now all you need to do is:
Step 1: Prepare the mix
Preheat your oven to 350F. With spray oil, spray a springform pan (preferably 8 inches). In a bowl, add the melted butter and graham crackers and mix well. Now put the crust into the pan and pack in tightly. In a separate bowl, mix the cream cheese until smooth. Next, add the vanilla and sugar to this bowl and mix well. Add the yogurt, egg whites, flour, and lemon juice gradually and mix well.
Step 2: Pour the filling
Put 1/3 of a cup of this cheese mixture to one side and add the milk and cocoa powder with it, and mix well. With the rest of the cream cheese mix, pour into the pan. Distribute evenly and place dollops of 1/3 of a cup of chocolate cheese mix over the top, swirling with a toothpick or a skewer as you go, to create the marble effect.
Step 3: Bake
If you’re using an 8-inch pan, you’ll need to bake for around 25 minutes. However, if your pan is slightly bigger, or smaller, be sure to adjust the baking times accordingly. Once set in the oven, remove and allow to cool on a wire rack. Now put the cheesecake into the refrigerator for a few hours to chill before serving.
Step 4: Enjoy!
Your cake is now ready to serve! However, you may wish to decorate with some fresh fruit with a low-fat dairy topping. If you’re looking for a healthier option, fresh fruit such as strawberries and raspberries are the best idea.
Conclusion
I hope this article has helped you to perfect your chocolate marble cheesecake recipe. Whether you’re looking for a healthy cheesecake, or a cheesecake to really treat yourself to – either of these recipes are perfect and are ideal for a quick, easy dessert.
Do you know of any other marble cheesecake recipes? Or have any tips or tricks to share to make the perfect marbling effect on a cheesecake? If so, please feel free to let me know in the comments below. Sharing is caring!
Read more about Chocolate Truffle Bomb Cake Recipe.
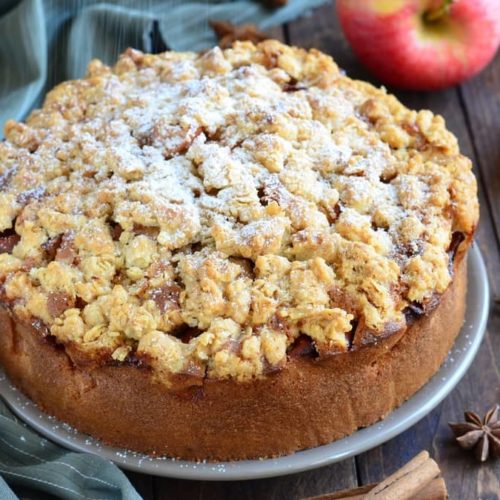
Apple Crisp Pie Recipe
Equipment
- Deep Dish/Tray
- Whisk
- Paper Towels
- Cutting Board
- Knife
- Oven
- Aluminum Foil
- Potato Peeler
- Plastic Wrap
- 2 Bowls
Ingredients
- 6 Cups of Sliced Apples approximately 6 apples
- 1 Cup of Brown Baking Sugar For this one cup it is important to split it into two sections. Place them apart and use one at a time. Some brown sugar is needed as a topping and glaze.
- 1 Cup of Unsweetened Oats
- 2 tbsp. of Cinnamon
- Pie Crust or Dough
- 1/2 Cup of Whole Milk Butter
- 1/2 Cup of White Flour
Instructions
- The first step in this Apple crisp pie recipe is to prepare the most important ingredient, the apples! To prepare the apples, you need to first peel them. Although you can use a knife to peel them, I like taking the easy way and using a potato peeler. Do this carefully.
- After the skins are peeled, you can either save them or throw them away. Cut the apples into slices as thick as you would like them to be for the filling, as well as the topping. Once step 1 is complete during this Apple crisp pie recipe, you can move onto step 2.
- After everything is made and put to the side, I recommend preheating the oven to 375 degrees Fahrenheit. This step changes depending on what the dough is. For example, when setting the dough, it could be thick and ones you need to roll out, or dough that is already pre-baked.
- Expert bakers familiar with this Apple crisp pie recipe can make their own dough, but it is harder and not necessary.
- Gather the ingredients for the filling and whisk them together in a large bowl. This includes the powder, melted butter, 1/2 cup of brown sugar, cinnamon, and the apples. Place this mixture in the fridge with plastic wrap.
- During the fourth step in this Apple crisp pie recipe, you will move on to creating the topping. This is easy as it is just a crumple made with small apple bits, cinnamon, sugar, and oats.
- Once you place all the ingredients together, starting with the stuffing inside of the dough, you can then bake this Apple crisp pie recipe for a minimum of 35 minutes. You will need to keep checking. It is ready when the dough is golden brown.
Notes
- I also have a few tips and tricks I would love to share with you when it comes to this Apple crisp pie recipe. For example, I recommend making the apple cinnamon mixture for the crisp a day before and placing it in the fridge. This preserves the sliced apples and allows the apple slices to soak in the flavors of sugar and cinnamon.
- I also recommend adding the topping after the pie has baked halfway. This way, there are less chances that the toppings will burn. If needed, use aluminum foil to protect this outer layer.